
How To Use AWS Glue With Snowflake
In the connected world, data is being generated from many different sources, with a good selection of formats. Enterprises are attempting to find tools to consume from these evolving data sources, similar to programmatically customizing the data to satisfy their data analytics needs.
Companies need solutions that facilitate meeting their business needs, without providing any fixed hardware or software resources and keeping costs low with a pay-as-you-use model.
AWS Glue could be a serverless data integration service that produces easy to seek out, prepare, and blend data for analytics, machine learning (ML), and application development. AWS Glue offers all the capabilities required for data integration. Besides, it analyses your data in minutes rather than weeks.
To further support an oversized choice of use cases, AWS Glue has launched a replacement capability at AWS re: Invent 2020 to support custom third-party connectors which will help users just organize data integration workflow with visual components using AWS Glue Studio within minutes and just with a few clicks.
AWS Glue Customer Connectors help users to navigate, look and choose connectors from the AWS Marketplace or bring their connectors. With this new feature, users can simply connect with Snowflake using their Snowflake connector and start arranging the knowledge pipeline real quick. We expect again a few, thanks to unifying your datasets in your Amazon Simple Storage Service (Amazon S3) data lake with data in Snowflake and browse and transform it using AWS Glue.
Why AWS Glue with Snowflake?
Snowflake customers now have a straightforward choice to manage their programmatic data integration processes without fear about servers, Spark clusters, or the continued maintenance traditionally related to these systems.
AWS Glue offers a fully managed environment that easily integrates with Snowflake’s data warehouse-as-a-service. Together, these two solutions enable customers to manage their data ingestion and transformation pipelines with more ease and suppleness than ever before.
With AWS Glue and Snowflake, customers get the additional benefit of Snowflake’s query pushdown which automatically pushes Spark workloads, translated to SQL, into Snowflake. Customers can target writing their code and instrumenting their pipelines without having to stress about optimizing Spark performance. With AWS Glue and Snowflake, customers can reap the advantages of optimized ELT processing that’s low cost and straightforward to use and maintain.
Solution overview
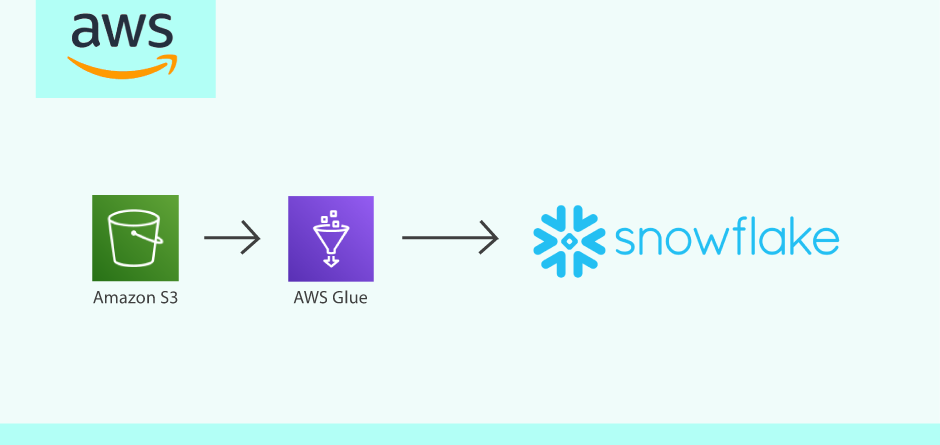
AWS Glue is an ETL service from Amazon that permits you to simply prepare and cargo your data for storage and analytics. Using the PySpark module together with AWS Glue, you’ll be able to create jobs with data over JDBC connectivity, loading the info directly into AWS data stores. Through this article, we’ve learned about uploading the Data JDBC Driver for Snowflake into an Amazon S3 bucket and making and running an AWS Glue job to take Snowflake data and store it in S3 as a CSV file.
ACTION WITH AWS GLUE AND SNOWFLAKE
Prerequisites:
- The Latest Snowflake Spark Connector
- The Latest Snowflake JDBC Driver
- S3 bucket within the same region as AWS Glue
Setup
Create a custom connector first to implement this solution.
- Log into AWS.
- Search for and click on the S3 link.
- Create an S3 bucket and folder.
- Add the Spark Connector and JDBC .jar (Java Archive) files to the folder.
- Create another folder within the same bucket to be used because of the Glue temporary directory in later steps (see below).
- Switch to the AWS Glue Service.
- Click on Jobs on the left panel under ETL.
- Click on Jobs on the left panel under ETL.
- Add employment by clicking Add job, click Next, click Next again, then click Finish.
- Provide a reputation for the task.
- Select an IAM role. Create a brand new IAM role if one doesn’t exist already and make sure to feature all Glue policies in the present role.
- Select the choice for a replacement script to be authored by you.
- Give the script a reputation.
- Set the temporary directory to the one you created in step 2c.
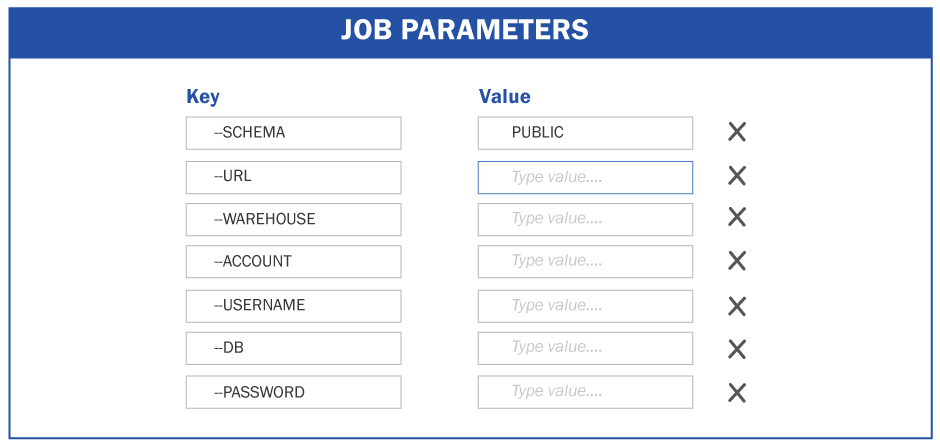
- Expand Script libraries and job parameters:
- Under Dependent jars path, add entries for both .jar files from 2b.
- Under Job parameters, enter the subsequent information along with your Snowflake account information. confirm to incorporate the 2 dashes before each key.
[NOTE: Storing your account information and credentials in this manner will expose them to anyone with access to the present job. This could be useful for testing purposes but it’s recommended that you simply, securely store your credentials as outlined within the section: Store credentials securely.]
- Click Next twice, then click Finish.
- You’ll be prompted with a blank script interface.
SAMPLE SCRIPT
Use the following sample script to test the integration between AWS Glue and your Snowflake account. This script assumes you have stored your account information and credentials using Job parameters.
import sys
from awsglue.transforms import *
from awsglue.utils import getResolvedOptions
from pyspark.context import SparkContext
from awsglue.context import GlueContext
from awsglue.job import Job
from py4j.java_gateway import java_import
## @params: [JOB_NAME, URL, ACCOUNT, WAREHOUSE, DB, SCHEMA, USERNAME, PASSWORD]
SNOWFLAKE_SOURCE_NAME = "net.snowflake.spark.snowflake"
args = getResolvedOptions(sys.argv, ['JOB_NAME', 'URL', 'ACCOUNT', 'WAREHOUSE', 'DB', 'SCHEMA', 'USERNAME', 'PASSWORD'])
sc = SparkContext()
glueContext = GlueContext(sc)
spark = glueContext.spark_session
job = Job(glueContext)
job.init(args['JOB_NAME'], args)
java_import(spark._jvm, SNOWFLAKE_SOURCE_NAME)
## uj = sc._jvm.net.snowflake.spark.snowflake
spark._jvm.net.snowflake.spark.snowflake.SnowflakeConnectorUtils.enablePushdownSession(spark._jvm.org.apache.spark.sql.SparkSession.builder().getOrCreate())
sfOptions = {
"sfURL" : args['URL'],
"sfAccount" : args['ACCOUNT'],
"sfUser" : args['USERNAME'],
"sfPassword" : args['PASSWORD'],
"sfDatabase" : args['DB'],
"sfSchema" : args['SCHEMA'],
"sfWarehouse" : args['WAREHOUSE'],
}
## Read from a Snowflake table into a Spark Data Frame
df=spark.read.format(SNOWFLAKE_SOURCE_NAME).options(**sfOptions).option("dbtable", "[table_name]").load()
## Perform any kind of transformations on your data and save as a new Data Frame: df1 = df.[Insert any filter, transformation, or other operation]
## Write the Data Frame contents back to Snowflake in a new table df1.write.format(SNOWFLAKE_SOURCE_NAME).options(**sfOptions).option("dbtable", "[new_table_name]").mode("overwrite").save() job.commit()
Conclusion
AWS Glue Customer Connectors help users to search and select connectors from the AWS Marketplace or bring their own connectors. Using this new feature, users can easily connect to Snowflake with a few clicks using their own Snowflake connector and start orchestrating the data pipeline in minutes.
Snowflake’s cloud data warehouse has a multitude of benefits, with its pay-as-you-go model, easy scalability, quick response time, and security. If you’re looking to invest in a cloud data warehouse that fulfills your business needs, book a session with us.
Happy data analysis!
RECENT POSTS
CATEGORIES